
by
Sven-Göran Bergh


This document is primarily designed for my own records for future use. However, it is always nice if it may help others to get started with Linux on their laptops. The steps to get things to play on the Acer Ferrari 3400 Lmi are described here. Most procedures are general and may be useful for other hardware as well.
! ! ! WARNING ! ! !
However, I must warn those of you that still enjoy the luxury of an independent mind and free will. Stay away! Do not ever lay your hands on the Ferrari.
The same warning applies to the GNU/Linux software platform in general. It was several years ago my self defense was totally broken.
The combination is truly devastating! I have noticed strange things happening to me since I got My Precious...
Please feel free to comment on any topic or possible improvements in this document.
This is an updated version of this document. This time I have chosen to install Fedora 8 x86_64, and many things has really changed to the better. The first version dealt with FC4-x86_64, and there are no major changes for FC5-x86_64. Consequently, if you are heading for FC4 or FC5 you probably want to have a look at the previous version of this document. While some details may be specific for Fedora, most stuff should translate to other distributions as well.
I've got all of the hardware working. Although, somethings need some extra tweaks. A summary may be found in the table below
| Hardware | Status | Details | Notes |
|---|---|---|---|
| CPU | OK | Mobile AMD Athlon 64 3000+ | No configuration needed. Even freqency scaling works out of the box. |
| PCI Bridge | OK | VIA VT8237 [K8T800/K8T890 South] | No configuration needed. |
| Display | OK | 15" SXGA TFT (1400x1050) | No configuration needed. |
| Graphics card | OK | ATI Mobility Radeon 9700 128 MB, 8x AGP | Full functionality with the radeon driver, see below. |
| RAM | OK | 512 MB DRAM (extended to 2GB) | No configuration needed. |
| Hard drive | OK |
Original: Hitachi Travelstar 80 GB Ultra ATA 100, IC25N080ATMR04-0, 4200 rpm. Upgrade: Seagate Momentus, 160 GB, ATA/ATAPI-6, 5400rpm, ST9160821A |
No configuration needed. |
| NIC (wired) | OK | Broadcom NetXtreme BCM5788 Gigabit Ethernet | No configuration needed. |
| NIC (wireless) | OK | Broadcom BCM4306 802.11b/g W-LAN | Use kernel module b43, see comments below. |
| Modem | OK | VIA AC'97 56k Modem. | Unstable. See below for configuration. |
| DVD drive | OK | Matshita DVD-RAM UJ-825S (DVD/CD +/- R/W, DVD-RAM) | No configuration needed. |
| Sound | OK | VIA VT8233/A/8235/8237 AC97 Audio | No configuration needed. |
| Touchpad | OK | Synaptics SynPS/2 with 4 multi-buttons | No configuration needed. Multi-buttons works as well. |
| ACPI | OK | Suspend to RAM, Suspend to disk, etc. |
No configuration needed. Works out of the box. |
| Special keys & buttons | OK | Mail, web, P1, P2, volume, mute, Fn-*, etc. | See below for configuration. |
| PC-card | OK | Texas Instruments PCI4510 PC card/Cardbus | No configuration needed. |
| Bluetooth | OK | Cambridge Silicon Radio | No configuration needed, see comment below. |
| IEEE 1394 Firewire | OK | Texas Instruments PCI4510 IEEE-1394 | No configuration needed, see comments below. |
| USB | OK | VIA, 4xUSB 2.0 | No configuration needed. |
| Infrared | OK | See below for configuration. | |
| Card reader | OK | 5-in-1 (MMC, SM, SD, MS [Pro]) | No configuration needed. |
No special procedure is needed during the core installation of F8 x86_64. Partition the hard drive as desired and install the components that you like. However, some packages will make life easier when configuring your new laptop. These are mentioned in the corresponding sections below and may be installed afterwards.
Depending on your setup there are some pitfalls you should know about.
Fedora Core 5 installation and later runs without any problems, while Fedora Core 4 should be started with:
# linux nofb
This tells the installation to disable the frame buffer so you may use the graphical mode of the installer. Otherwise you will loose the display shortly after the installation enters graphical mode. This only applies to FC4 and earlier.
However, depending on your hardware you might notice a strange disk size
during the installation of F8. If you see a disk size less than expected you
should pass the kernel option libata.ignore_hpa=1
to the installation.
vmlinuz initrd=initrd.img libata.ignore_hpa=1
No hassle what so ever, but my own reflection is that the standard hard drive does not match the “high end gear” profile of this laptop. When the laptop was released 120 MB drives was the latest of the greatest and 100MB drives were off the shelf goods in most stores. However, a smaller drive would have been ok at a higher speed, at least 5400rpm.
I am addicted to VMware and want extra of everything, size, speed, RAM, etc.
Thus, I have replaced the original Hitachi Travelstar 80 GB (4200rpm) drive
with a Seagate Momentus 160 GB (5400rpm, ATA/ATAPI-6, ST9160821A). What a
difference! The higher speed, as well as the higher storage density, pays off
in far better performance. Operating temperature is the same as for the
original drive. According to the smartmontools it runs at 40-48
°C during normal load with peaks above 50 °C during heavy load. A
highly recommended upgrade!
Depending on the hardware you might notice a strange disk size of your new
drive. If you just plan to copy your existing installation to the new drive
you need the following two lines in your /etc/modprobe.conf
file:
alias scsi_hostadapter libata options libata ignore_hpa=1
If you plan on installing a fresh system on the new drive take a look in
the 2 Installation section above. During the installation the
proper entries are written to /etc/modprobe.conf
With FC5 and later there should not be any problems with the IEEE 1394 Firewire support. For me it works just as smooth as the USB support. If you are running kernel version 2.6.14 or later you may skip this section, unless you have specific interest in tweaking you Firewire settings.
A new alternative driver stack for Firewire support (a.k.a Juju) was introduced as experimental in kernel version 2.6.22. In Fedoras kernel configuration 2.6.23.9-85.fc8 the new IEEE1394 driver stack replaces the old drivers. The rest of this section deals with the old driver stack, i.e before Fedora kernel 2.6.23.9-85.fc8. For the most recent information please refer to http://www.linux1394.org.
However, on systems with kernel version 2.6.13 or earlier some might experience problems with the Firewire support due to different default values used in the kernel module. First a short description of the potential problems.
There are no problems regarding loading modules or mounting an external IEEE 1394 drive, and if you are patient you managed to browse the content as well. The problems starts when you try to transfer larger amounts of data. The process stalls and chokes up the system log with messages like:
kernel: ieee1394: sbp2: aborting sbp2 command kernel: scsi1 : destination target 0, lun 0 kernel: command: Write (10): 2a 00 02 e1 bc 58 00 00 10 00 kernel: ieee1394: sbp2: aborting sbp2 command kernel: scsi1 : destination target 0, lun 0 kernel: command: Write (10): 2a 00 02 e1 bc 58 00 00 10 00 kernel: ieee1394: sbp2: aborting sbp2 command kernel: scsi1 : destination target 0, lun 0 kernel: command: Test Unit Ready: 00 00 00 00 00 00 kernel: ieee1394: sbp2: reset requested kernel: ieee1394: sbp2: Generating sbp2 fetch agent reset redneck kernel: ieee1394: sbp2: aborting sbp2 command kernel: scsi1 : destination target 0, lun 0 kernel: command: Write (10): 2a 00 01 06 d0 df 00 00 03 00 kernel: ieee1394: sbp2: aborting sbp2 command kernel: scsi1 : destination target 0, lun 0 kernel: command: Write (10): 2a 00 01 06 d0 df 00 00 03 00 kernel: ieee1394: sbp2: aborting sbp2 command kernel: scsi1 : destination target 0, lun 0 kernel: command: Write (10): 2a 00 02 e1 bd b0 00 00 20 00
Seems to me like a hole bunch of timeouts with corresponding bus resets. These suspicions got even stronger after timing a read data transfer:
# time cp -rp /media/ieee1394disk/430MB_folder real 20m29.516s user 0m0.052s sys 0m6.476s
Copying 430 MB takes 20 minutes 29 seconds (comparable to USB 1.0 performance). However, the “actual” time is less than 7 seconds. 20 minutes and 22 seconds are spent waiting. Waiting for what? I do not know, but obviously some bits and pieces fail during the transfer. Furthermore, I do not feel comfortable with the data integrity when I see these kind of results.
After some digging in the kernel documentation and a quick look in the
sbp2.c source file it turned out that this problem probably is
related to a “buggy IEEE 1394 chip” in the external device. The proposed
solution is to load the sbp2 module with the argument
serialize_io=1. It turned out really well, so here are some tips
regarding the IEEE 1394 configuration.
If you experience the problems mentioned above, and you are running kernel
version 2.6.13 or earlier, put the following line in your
/etc/modprobe.config:
options sbp2 serialize_io=1 max_speed=2
The serialize_io=1 option tells the scsi drivers to only send
one scsi command at a time. Unfortunately, this setting has a small impact on
performance, but it is the fix that makes things work.
In kernel version 2.6.14 the default value for serialize_io
was changed from 0 to 1. Thus, if you are running
kernel version 2.6.14 or later you should not need do do anything, unless you
want to optimize performance (see comments below) or fiddle with the other
settings.
The max_speed option might be useful in rare occasions if you
want to limit the maximum transfer rate to support “even more buggy” external
hardware. Valid values for the max_speed option are:
| 0 | 100 mb |
| 1 | 200 mb |
| 2 | 400 mb (default) |
| 3 | 800 mb |
When timing the very same read transfer as above I now get the following result:
# time cp -rp /media/ieee1394disk/430MB_folder real 0m24.871s user 0m0.076s sys 0m6.400s
That is what I call improvement! Going from over 20 minutes down to roughly 25 seconds.
After some further exercises with other external hard drives it turned out
that the problem described in the previous section indeed seems to be related
to the IEEE 1394 chip in the external drives. With some hardware it is quite
possible to use the faster serialize_io=0 option. The performance
benefit is in the range 20-25%, so consider your options. If you only use IEEE
1394 for your own hardware and it works well with the faster setting, go for
it. Otherwise, compatibility with other hardware might be more valuable.
Personally, I think it was a wise decision to change the default setting in
the sbp2 module. After all those “buggy IEEE 1394 chips” seem to
be quite common, and prior to start optimizing performance you just want things
to work.
USB support works as expected. I have noticed no problems what-so-ever with the USB ports. Especially with the desktop enhancements introduced with FC5 it works like a charm. Absolutely no configuration needed.
The 5-in-1 card reader utilizes the USB interface and is operational right after installation. Analogous to the USB ports there is no hassle at all.
I have only used the PC-card slot for a Compact Flash memory adapter and it just works. True plug-and-play.
The special keys & buttons are some what confusing. Some of the special buttons do not need any additional configuration to work. Others need a key code mapping, while some even lack a scan code. The chain of scan codes and key codes translations starts in the core Linux kernel and ends in your X configuration. Some examples of confusion:
The Mail button gets a pre-configured key code of 155 by Linux,
but with X loaded the key code is 236. The buttons
WWW, Fn-F4, Fn-F5, Fn-F8,
Fn-up and Fn-down show similar behavior.
The buttons P1, P2, Fn-F1,
Fn-F2, Fn-F3 do not have pre-configured key codes,
while their respective scan codes are e074, e073,
e025, e026 and e027. However, in single
user mode they all lack scan-codes. I do not know why.
However, do not despair. It is possible to get all of the special keys & buttons working. Here is a short summary of my current status on this issue.
| Config | |||||
|---|---|---|---|---|---|
| Button | Work | setkeycodes | Xmodmap | KDE | Comments |
Mail |
yes | x | x | E-mail button, ex: launch Thunderbird | |
WWW |
yes | x | x | WWW button, ex: launch Firefox | |
P1 |
yes | x | x | x | User button, ex: launch NetBeans |
P2 |
yes | x | x | x | User button, ex: launch VMware |
Fn-F1 |
yes | x | x | x | User button, ex: |
Fn-F2 |
yes | x | x | x | User button, ex: |
Fn-F3 |
yes | x | x | x | User button, ex: |
Fn-F4 |
yes | Sleep-button recognized by ACPI. | |||
Fn-F5 |
yes | x | x | Toggle external display, XF86Display | |
Fn-F6 |
yes | Dim display, no configuration needed | |||
Fn-F7 |
yes | Toggle touch-pad, no configuration needed | |||
Fn-F8 |
yes | x | x | Toggle mute | |
Fn-Home |
yes | Go home (XF86Home) | |||
Fn-End |
yes | Go to end (XF86End) | |||
Fn-up |
yes | x | x | Volume, raise | |
Fn-down |
yes | x | x | Volume, lower | |
Fn-left |
yes | Brightness, lighter. No configuration needed | |||
Fn-right |
yes | Brightness, darker. No configuration needed | |||
Bluetooth |
yes | No configuration needed | |||
WLAN |
yes | No configuration needed |
It is a tedious procedure to find out the proper scan-codes, Linux key-codes and X key-codes. Yes, on top of the scan-codes there are both Linux and X key-codes to keep track of. I probably have it all confused, but here is how I did it:
Start by finding out what key-codes X already knows of.
Here xev is a valuable friend. The buttons that
had key codes configured by default for me was:
| Button | X key-code | Default X key symbols |
|---|---|---|
| 236 | - | |
| WWW | 178 | - |
| Fn-F4 | 223 | None, but triggers KPowersave suspend->RAM |
| Fn-F5 | 214 | none, but generate a Capability changed event that is received by the X-server. |
| Fn-F8 | 160 | - |
| Fn-NumLk | 77 | Num_Lock |
| Fn-Scr Lk | 78 | Scroll_Lock |
| Fn-Home | 97 | Home |
| Fn-End | 103 | End |
| Fn-up | 176 | - |
| Fn-down | 174 | - |
These are the buttons that are the simplest to get working. Save these X key-codes for future use. First we need to get the other keys to show up under X as well. In order for them to do so they need properly configured Linux key-codes that they lack for the moment.
This step is different and considerable easier under F8 than FC4 or FC5. There is no need to shutdown X now as before.
Just press the desired key, ex. P1. Then take look at
the dmesg output:
# dmesg | tail atkbd.c: Unknown key pressed (translated set 2, code 0xf4 on isa0060/serio0). atkbd.c: Use 'setkeycodes e074 <keycode>' to make it known. atkbd.c: Unknown key released (translated set 2, code 0xf4 on isa0060/serio0). atkbd.c: Use 'setkeycodes e074 <keycode>' to make it known.
I got the following result:
| Button | scan-code |
|---|---|
| P1 | e074 |
| P2 | e073 |
| Fn-F1 | e025 |
| Fn-F2 | e026 |
| Fn-F3 | e027 |
Next, figure out what Linux key-codes that are available by looking at the Linux scan-code - key-code mapping.
# getkeycodes Plain scancodes xx (hex) versus keycodes (dec) for 1-83 (0x01-0x53) scancode equals keycode 0x50: 80 81 82 83 99 0 86 87 0x58: 88 117 0 0 95 183 184 185 0x60: 0 0 0 0 0 0 0 0 0x68: 0 0 0 0 0 0 0 0 0x70: 93 0 0 89 0 0 85 91 0x78: 90 92 0 94 0 124 121 0 Escaped scancodes e0 xx (hex) e0 00: 0 0 0 0 0 0 0 0 e0 08: 0 0 0 0 0 0 0 0 e0 10: 165 0 0 0 0 0 0 0 e0 18: 0 163 0 0 96 97 0 0 e0 20: 113 140 164 0 166 0 0 0 e0 28: 0 0 255 0 0 0 114 0 e0 30: 115 0 172 0 0 98 255 99 e0 38: 100 0 0 0 0 0 0 0 e0 40: 0 0 0 0 0 119 119 102 e0 48: 103 104 0 105 112 106 118 107 e0 50: 108 109 110 111 0 0 0 0 e0 58: 0 0 0 125 126 127 116 142 e0 60: 0 0 0 143 0 217 156 173 e0 68: 128 159 158 157 155 226 0 112 e0 70: 0 0 0 0 0 0 0 0 e0 78: 0 0 0 0 0 0 0 0
First we need to set a Linux key-code for the keys that lack one.
Add the following lines to /etc/rc.d/rc.localto set the
key-codes after all services are started.
# Set Linux key-codes for special keys & buttons: # # Buttons: P1 P2 setkeycodes e074 151 e073 152 # # Buttons: Fn-F1 Fn-F2 Fn-F3 setkeycodes e025 131 e026 132 e027 133
In order to avoid a restart to load these setting, issues the very same commands.
# setkeycodes e074 151 e073 152 # setkeycodes e025 131 e026 132 e027 133
Repeat the step 1 and use xev to figure out what X
key-codes these buttons got. I got the following:
| Button | X key-code |
|---|---|
| P1 | 201 |
| P2 | 146 |
| Fn-F1 | 135 |
| Fn-F2 | 140 |
| Fn-F3 | 248 |
Ok, now we have X key-codes for all special keys & buttons and
need to map them to proper key-symbols. In order to do that put the
following in the file /etc/X11/Xmodmap:
! Acer Ferrari 3400Lmi special keys & buttons ! ! Button X key-code ! ------ ---------- ! Mail 236 ! WWW 178 ! P1 201 ! P2 146 ! Fn-F1 135 ! Fn-F2 140 ! Fn-F3 248 ! Fn-F5 214 ! Fn-F8 160 ! Fn-up 176 ! Fn-down 174 ! keycode 236 = XF86Mail keycode 178 = XF86WWW keycode 201 = XF86Launch1 keycode 146 = XF86Launch2 keycode 135 = XF86Launch3 keycode 140 = XF86Launch4 keycode 248 = XF86Launch5 keycode 214 = XF86Display keycode 160 = XF86AudioMute keycode 176 = XF86AudioRaiseVolume keycode 174 = XF86AudioLowerVolume
The setting above are loaded the next time X is started, but to load them without a restart of X do:
# xmodmap -verbose /etc/X11/Xmodmap ... ! ! executing work queue ! keycode 0xec = XF86Mail keycode 0xb2 = XF86WWW keycode 0xc9 = XF86Launch1 keycode 0x92 = XF86Launch2 keycode 0x87 = XF86Launch3 keycode 0x8c = XF86Launch4 keycode 0xf8 = XF86Launch5 keycode 0xd6 = XF86Display keycode 0xa0 = XF86AudioMute keycode 0xb0 = XF86AudioRaiseVolume keycode 0xae = XF86AudioLowerVolume
Finally it is time to configure the button actions. Actions for all but the audio control keys are easily configured in the KDE Control Center -> Regional & Accessibility -> Keyboard Shortcuts under the tab Command Shortcuts.
However, you probably also want to configure the audio control buttons. This is done in the same manner inside KMix. Fire up KMix and go to the menu Settings/Configure Global Shortcuts...
If you want to use the Fn-F5 key to manipulate the graphical output, refer to the section 10 Graphics below.
A pleasant news is the advancements in ACPI support. Now all the desirable features are working right out of the box, without any configuration.
I am glad to see that both Suspend to Disk and Suspend to RAM works like a charm. Previous there has been a lot of struggle, if at all possible, to get a stable and reliable ACPI support. OK, I know that suspend has been around for a while by now, but hand on the heart - has it been user friendly and reliable? I have not had that experience. So a reliable ACPI support right out of the box feels really luxurious.
Even the special sleep key, Fn F4, is configured during the installation and works as expected (Suspend to RAM). The power button works of course as well, as it always has done.
The CPU frequency scaling has been working for quite some time now. So it is no big surprise that it works out of the box in F8 on this puppy. However, it is always nice to see things evolve and improve. The improvements of the suspend functionality mentioned above together with solid CPU frequency management really shows off in power management.
KPowersave now feels really mature and has three pre-configured CPU policies: Performance, Dynamic and Powersave. Dynamic is the default and there is no real reason to change it.
The advancement of Xorg and its related drivers and modules has been enormous the last two years. Fedora 8 includes Xorg 7.2 which is a welcome improvement in X-server configuration. Furthermore, there is absolutely no need to use the ATI proprietary driver any more. This is a true liberation, for sure I will not miss all the violations the proprietary ATI driver did to my Xorg configuration.
The graphical hardware is properly identified and setup during the installation, so you will enjoy X11 right from the start.
Another nice thing is that the dim display button, Fn-F6, works without any configurations.
The Ferrari 3400 is equipped with a ATI Mobility Radeon 9700 chip. This
chip has 128MB of memory and provides two external outputs, VGA-0 and
S-video. The built-in display is called LVDS. These names refer to the
definitions used by the radeon X driver.
The graphical chip has 2 CRTCs, eg pipeline for rendering graphics. This means that only two outputs may be active simultaneously, either LVDS + VGA-0, LVDS + S-video or VGA-0 + S-video. This is a common limitation for most graphics hardware.
Note: The output names
differ depending on the driver used. The names used in this document relate
to the radeon driver. If you use some other driver use
xrandr -q to find out the proper names (provided that it supports
RandR).
radeon driverSupport for the ATI Mobility Radeon 9700 chip in the Ferrari is provided
by the radeon driver. This driver supports all the features we
want: the RandR extension (v 1.2), 3D acceleration (DRI) and TV-out.
There is also the ati driver, not to be confused with the
proprietary fglrx driver. However, the ati
driver is only a wrapper that auto-detects ATI cards and load the appropriate
driver. In our case that will result in the radeon driver being
loaded.
The main improvement in Xorg 7.2 is the arrival of version 1.2 of the X
RandR (Resize and Rotate) extension. It provides automatic discovery of modes
together with the ability to configure outputs dynamically. As of today only
a few drivers support RandR 1.2. Fortunately, the radeon
driver is one of them.
If you are familiar with X configuration and take a look at the default
/etc/X11/xorg.conf file, generated during the installation you
will notice a significant change. Many of the traditional settings, sync and
refresh rates, modes and modelines, are gone. All these settings are now
auto-detected by RandR 1.2 and should only be present if you want to override
the detected values. In some rare situations this might be needed, e.g. when
an external monitor reports incorrect values.
In order to get full dual-head support you only need to add one line to the default X configuration. If you want to optimize 3D acceleration you need another line. That is a total of two lines for a full fledge X configuration supporting all features. Quite an improvement. Thank you all nice X guys!
The X server log file /var/log/Xorg.0.log will be your
valuable companion when it comes to troubleshooting or just checking what
configuration that is auto-detected.
For reference my xorg.conf is presented in
Appendix A.
The X Resize and Rotate (RandR) extension introduces a significant shift
in dual-head configuration with its version 1.2. All your setting may now be
altered on the fly by the command line tool xrandr, and there is
no need to restart the X server.
RandR works its magic by means of a virtual screen that is larger than the a single monitor.
The size of the virtual screen is reported as the maximum value by the command:
# xrandr -q Screen 0: minimum 320 x 200, current 1400 x 1050, maximum 1400 x 1200 ...
In this case the size is 1400x1200, which is the default virtual screen
size for this setup. The default screen size is too small for serious
dual-head configurations. This value needs to be increased by setting the
Virtual option in the Display sub-section in
/etc/X11/xorg.conf:
SubSection "Display" Viewport 0 0 Depth 24 Virtual 3000 2000 EndSubSection
This is the most (only) important setting needed in xorg.conf.
However, in order to enjoy hardware support for 3D acceleration the virtual
screen may not be larger than 3000x2000. This limitation differs for the
various driver, but for the radeon driver the limitation is
3000x2000. This is sufficient for having an external monitor running at
1600x1200 side-by-side with your internal display as 1400x1050.
After modifying xorg.conf you need to restart your X server,
ie. logout and logon again. Now, check your settings once again:
# xrandr -q Screen 0: minimum 320 x 200, current 1400 x 1050, maximum 3000 x 2000 VGA-0 connected (normal left inverted right x axis y axis) 1280x1024 59.9 1152x864 75.0 74.8 1024x768 84.9 75.1 70.1 60.0 43.5 832x624 74.6 800x600 84.9 72.2 75.0 60.3 56.2 640x480 84.6 75.0 72.8 66.7 60.0 720x400 87.8 70.1 LVDS connected 1400x1050+0+0 (normal left inverted right x axis y axis) 0mm x 0mm 1400x1050 60.0*+ 1360x768 59.8 60.0 1280x800 60.0 1152x864 60.0 1280x768 60.0 1280x720 60.0 1024x768 60.0 800x600 60.3 640x480 59.9 S-video disconnected (normal left inverted right x axis y axis)
In the xrandr -q output above we see that the new
virtual screen size is recognized in the maximum value. Furthermore, we see
our three supported outputs, VGA 0 (external display), LVDS (internal
display), S-video (TV-out). For the report above an external monitor
is connected but not activated. Still xrandr -q reports
its supported modes. Neat!
xrandr toolIt is highly recommended that you read through the man page for
xrandr and play with it a bit to get to know it. A good place to
start is at the debian wiki
http://wiki.debian.org/XStrikeForce/HowToRandR12.
It is a great tool that you most likely will find useful. Connect an external
monitor and try the following commands.
Get a full report of the current status by:
# xrandr --verbose
Activate the external monitor with its default mode and mirror the internal display:
# xrandr --output VGA-0 --auto
Put the external monitor to the left of the internal panel with:
# xrandr --output VGA-0 --left-of LVDS
Change resolution and refresh rate of the external monitor:
# xrandr --output VGA-0 --mode 1024x768 --rate 60
Turn off the external monitor:
# xrandr --output VGA-0 --off
Set the TV-output in PAL mode instead of the default NTSC:
# xranrd --output S-video --set tv_standard pal
Fn-F5 buttonOnce the virtual screen is configured and we feel confident in
xrandr, it is time to focus on the Fn-F5 special button.
By default it does nothing, but now we have the tools to configure it the
way we want it to work.
First the Fn-F5 button needs to be recognized, so please refer to the section 8 Special keys & buttons above for the basic setup of the Fn-F5 button. After that we design a script to run once Fn-F5 is pressed.
The Fn-F5 button should provide a simple, basic and robust functionality that works for any external monitor. I prefer to toggle through the available connected external outputs, while keeping the internal monitor alive. Furthermore, each connected external output is present in two operating modes. First the external output mirrors the internal display, then it extends the desktop by operating side-by-side with the internal display. When both VGA-0 and S-video are connected the following operation modes are toggled each time Fn-F5 is pressed.
If a certain external device is not connected those modes are skipped. Consequently, the sequence above will only appear when both VGA-0 and S-video are connected. With only VGA-0 connected the sequence will only include the first three modes from above.
Notice that the internal monitor may be dimmed at any time by pressing the Fn-F6 button. Thus, turning off the internal monitor is not included in the script. The script is outlined in Appendix B and may be downloaded at http://ferrari.database.se/3400/f8/dual-head.sh.
The script also includes some other common operation to manipulate the graphical outputs. To see all supported operations, try:
dual-head.sh help
Binding this script to the Fn-F5 button is then configured in the KDE Control Center -> Regional & Accessibility -> Input Actions.
If you run a more permanent dual-head setup you may want to configure the preferred default settings in xorg.conf. This is done by the Monitor sections and the lines
Option ”Monitor-<output>” “...”
in the Device section of the xorg.conf file.
3D hardware acceleration is provided by the dri module. This
module is loaded by default by the radeon driver, so no additional
configuration is needed in xorg.conf to get hardware support for
3D. However, any possible optimizations that might improve performance are
desirable.
In order to compare different settings we need some kind of benchmark tool.
A simple tool that comes with the glx-utils package found in most
distributions is glxgears. It may be rough, rudimentary and
lacking a lot of hype features, but it is present and sufficient for our
needs.
An interesting exercise is to explicitly disable hardware acceleration and
comparing the result with the default xorg.conf. Without hardware
acceleration glxgears clocks in around a modest frame rate of 150
FPS, compared with approximately 2050 FPS for the default configuration. This
is quite a difference, and it verifies that the radeon driver
really does its job.
The default values for most settings work well and there is no needed to
modify xorg.conf. Furthermore, most of the other settings are
correctly auto-detected, such as AGP 8x and memory. All this is reported by
the X server in its log file /var/log/Xorg.0.log during
startup.
The options of most interest for performance are AccelMethod
(default XAA), AGPMode (auto-detected), ColorTiling
(default on) and EnablePageFlip (default off). The first three
are correct by default, but due to instability in rare cases
EnablePageFlip is disabled by default.
Turning on the option EnablePageFlip in xorg.conf
reveals no flaws. I have not noticed any glitches with this option on my setup
so I feel confident in recommending it. Then the obvious question How good
is it? It is good!
glxgears gives us an indication. By enabling
EnablePageFlip performance is increased from 2050 FPS to about
3270 FPS. A significant boost for tweaking one single option.
You only need to add one line to the Device section in the default
xorg.conf to boost 3D performance:
Section "Device" Identifier "Videocard0" Driver "radeon" Option "EnablePageFlip" "1" EndSection
During the optimization procedures a few interesting observations were made. Primarily the CPU speed does not seem to matter. Most tests were run with the CPU frequency first set to 800MHz, then repeated at 2000MHz. No significant difference related to the CPU speed was noticed.
Furthermore, the size of the configured virtual screen does not affect performance. The tests has been run with the default size (1400x1200) and with 3000x2000, but no difference has been noticed. However, increasing the virtual screen to more than 3000x2000 will disable hardware acceleration and of course cripple performance completely.
These observations verifies that hardware 3D acceleration is really working
and that the radeon driver is taking care of business the way we
want it to.
TV output is available through the S-video connector on the rear of the
Ferrari. Furthermore, no special settings are needed in order to use it. It is
immediate available and may be controlled by xrandr. However, the
tips below might help to get you started.
The external outputs have a property called load_detection,
that controls whether RandR should try to auto-detect the output or not.
Usually it is a good thing to be able to auto-detect the different output
features. However, there are situations when you do not want auto-detection.
Remember that we have three outputs, but only two rendering pipelines
(CRTCs). What would then happen if we try to auto-detect and configure all
available outputs, xrandr --auto, with both VGA-0 and S-video
connected? We actually do not know. The internal display may only use the first
pipeline, CRTC 0, but that might be allocated by either VGA-0 or S-video.
Furthermore, we will have a race condition between the two remaining outputs
for the second pipeline, CRTC 1. In order to avoid potential conflicts
like that, auto-detection is disabled by default for S-video.
Thus, we first have to enable load_detection in order to use
the TV-output. That is done by:
# xrandr --output --set load_detect 1
The graphics chip defaults to NTSC, so those of us how want PAL need to explicitly specify this. To change the TV mode to PAL use:
# xrandr --output S-video --set tv_standard pal
The script for dual head management presented in Appendix B assumes that all external outputs may be auto-detected. Thus, if you want the script to consider TV-out as a possible external output you need to enable auto-detection for TV-out.
Consequently, we need to initialize some settings before TV-out is
automatically handled by the script. The script includes an initialization
option that may be used for this. Put the following line in the file
/etc/rc.local:
/usr/local/bin/dual-head.sh init
The Synaptics touch-pad is properly configured during the installation, and works well. I use it in conjunction with a USB mouse and both works well in parallel. I have seen some reports on problems with the touch-pad 4-way multi-button, but it works without any hassle for me. Likewise does the mouse wheel.
The InputDevice section in xorg.conf configured during the
installation works well and needs no modification:
Section "InputDevice" Identifier "Synaptics" Driver "synaptics" Option "Device" "/dev/input/mice" Option "Protocol" "auto-dev" Option "Emulate3Buttons" "yes" EndSection
For a complete reference you find my /etc/X11/xorg.conf file
in Appendix A.
The special key to toggle the touch-pad (Fn F7) also works without any special configurations.
When it comes to the Broadcom BCM4306 802.11b/g WLAN chip on the Ferrari you
have two choices. The traditional NdisWrapper or the kernel module
b43. When I first got this laptop there was no other option than
NdisWrapper, but lately the kernel module b43 has evolved and
matured.
As its name implies NdisWrapper is a wrapper for NDIS drivers, meaning that you use a corresponding Windows driver instead of a Linux driver. For some WLAN chips this is still the only option, but lately many chips enjoy almost native Linux support by means of kernel modules. I say “almost” because many chips need to be fed with proprietary firmware in order to operate. Anyway, this is a step in the right direction, and the final goal must be to free the firmware as well.
With FC4 NdisWrapper was the obvious choice, but during FC5 its configuration
was (deliberately?) broken by the updates. Most FC5 updates re-installed the now
deprecated bcm43xx kernel module, even though it was previously
disabled and blacklisted. Thus, for most FC5 updates I had to disable the kernel
module once again and re-install NdisWrapper. In my opinion, the
bcm43xx kernel module was not mature enough to compete with
NdisWrapper at that time. So this was an endless struggle to keep my WLAN support
alive.
However, with F8 the b43 kernel module is mature, stable and
ready for production. How to get the b43 kernel module to work is
described below. To use the NdisWrapper please refer to the FC4 version of this
document, found at
http://ferrari.databa.se/3400/fc4/.
First we need to check and install some software so we have the tools we need.
First we needed to make sure that the b43 kernel module is
compiled and properly loaded during system startup. For standard F8
kernels this is the case, but if you compile your own brew you need
to build it as a module:
# dmesg | grep b43 b43-phy0: Broadcom 4306 WLAN found b43-phy0 debug: Found PHY: Analog 2, Type 2, Revision 2 b43-phy0 debug: Found Radio: Manuf 0x17F, Version 0x2050, Revision 2 # lsmod | grep b43 b43 150001 0 rfkill 14801 1 b43 mac80211 127949 1 b43 input_polldev 12113 1 b43 ssb 38725 1 b43
Next we need to make sure that the wireless-tools
package is installed on our system:
# rpm -q wireless-tools wireless-tools-29-0.2.pre22.fc8
If not, we need to install it:
# yum install wireless-tools
or
# rpm -Uvh wireless-tools-29-0.2.pre22.fc8.x86_64.rpm
Finally we will need the b43-fwcutter package. Make
sure that it is installed:
# rpm -q b43-fwcutter b43-fwcutter-008-1.fc8
or install it:
# yum install b43-fwcutter
Now we need to download the Broadcom driver, so we may extract the firmware from it later. Download it at:
http://downloads.openwrt.org/sources/broadcom-wl-4.80.53.0.tar.bz2
or I keep a local copy, just in case:
http://ferrari,databa.se/3400/fc8/broadcom-wl-4.80.53.0.tar.bz2
Uncompress the driver:
# tar jxf broadcom-wl-4.80.53.0.tar.bz2
Extract and install the firmware from the Broadcom driver as root:
# cd broadcom-wl-4.80.53.0/kmod/ # b43-fwcutter -w /lib/firmware wl_apsta.o
Now that we have all the pieces we need installed, it is time to check the functionality and get things working.
First we do it manually, to make sure we get the results and feedback that we expect. This is to verify the functionality and simplify troubleshooting, if needed.
The WLAN interface should show up:
# iwconfig wlan0 wlan0 IEEE 802.11g ESSID:"" Mode:Managed Channel:0 Access Point: Not-Associated Tx-Power=0 dBm Retry min limit:7 RTS thr:off Fragment thr=2352 B Encryption key:off Link Quality:0 Signal level:0 Noise level:0 Rx invalid nwid:0 Rx invalid crypt:0 Rx invalid frag:0 Tx excessive retries:0 Invalid misc:0 Missed beacon:0
Turn on the WLAN chip and bring up the interface:
# ip link set wlan0 up
OK, now it is time to find out what's in the air:
# iwlist wlan0 scan wlan0 Scan completed : Cell 01 - Address: 00:E0:63:50:98:B0 ESSID:"Perspektiv" Mode:Master Channel:1 Frequency:2.412 GHz (Channel 1) Quality=88/100 Signal level=-25 dBm Noise level=-71 dBm Encryption key:off Bit Rates:1 Mb/s; 2 Mb/s; 5.5 Mb/s; 11 Mb/s Extra:tsf=000000a1f76c1da7 Cell 02 - Address: 00:18:F8:D2:9E:F4 ESSID:"Secret Net" Mode:Master Channel:4 Frequency:2.427 GHz (Channel 4) Quality=81/100 Signal level=-25 dBm Noise level=-71 dBm Encryption key:on Bit Rates:1 Mb/s; 2 Mb/s; 5.5 Mb/s; 11 Mb/s; 18 Mb/s 24 Mb/s; 36 Mb/s; 54 Mb/s; 6 Mb/s; 9 Mb/s 12 Mb/s; 48 Mb/s Extra:tsf=0000003b0068b719 Cell 03 - Address: 00:11:6B:25:87:18 ESSID:"minideon" Mode:Master Channel:11 Frequency:2.462 GHz (Channel 11) Quality=68/100 Signal level=-25 dBm Noise level=-71 dBm Encryption key:off Bit Rates:1 Mb/s; 2 Mb/s; 5.5 Mb/s; 11 Mb/s; 6 Mb/s 9 Mb/s; 12 Mb/s; 18 Mb/s; 24 Mb/s; 36 Mb/s 48 Mb/s; 54 Mb/s Extra:tsf=0000008de44c3d92
Choose a network you want to connect to and set the ESSID of your W-LAN interface:
# iwconfig wlan0 essid Perspektiv
Your WLAN interface should now be associated with the access point:
# iwconfig wlan0 wlan0 IEEE 802.11g ESSID:"Perspektiv" Mode:Managed Frequency:2.412 GHz Access Point: 00:E0:63:50:98:B0 Bit Rate=1 Mb/s Tx-Power=27 dBm Retry min limit:7 RTS thr:off Fragment thr=2352 B Encryption key:off Link Quality=63/100 Signal level=-63 dBm Noise level=-58 dBm Rx invalid nwid:0 Rx invalid crypt:0 Rx invalid frag:0 Tx excessive retries:0 Invalid misc:0 Missed beacon:0
Now you are ready to start using your new interface. Most likely your first
step will be to request IP setting from an DHCP server
(dhclient -1 wlan0). The next step is probably to permanent your
preferences in the file
/etc/sysconfig/network-scripts/ifcfg-wlan0.
For further information on wireless networking under Linux, please refer to
the numerous HOWTOs on the internet. A good place to start is
http://www.hpl.hp.com/personal/Jean_Tourrilhes/Linux/Wireless.html.
Once you have verified that you have the wireless network chip operational, as described in the previous sections, it is time to have a look at a GUI that will help you with all these steps and some other valuable tasks. The NetworkManager is a service with a corresponding applet that will dock into your panel. It is included in most distributions nowadays and is started by:
# service NetworkManager start # service NetworkManagerDispatcher start
Try it out and play with it, if you like it and want it to start at system startup type:
# chkconfig --add NetworkManager # chkconfig --add NetworkManagerDispatcher # chkconfig --level 5 NetworkManager on # chkconfig --level 5 NetworkManagerDispatcher on
No special actions were needed for me to get Bluetooth up and running. It was truly amazing how easy it was. However, in order to be complete the details are summarized below.
Make sure that you have the bluez-utils package installed:
# rpm -q bluez-utils bluez-utils-2.25-4
Also make sure that it is configured to start at boot time:
# chkconfig --list bluetooth bluetooth 0:off 1:off 2:on 3:on 4:on 5:on 6:off
If not, you need to add it to the runlevel system:
# chkconfig --add bluetooth
Now watch your system log while you push the bluetooth button on the front of your laptop to activate your bluetooth circuities:
# tail -f /var/log/messages ... ... kernel: usb 4-2: new full speed USB device using uhci_hcd and address 4 ... kernel: usb 4-2: configuration #1 chosen from 1 choice ... hcid[1963]: HCI dev 0 registered ... hcid[1963]: HCI dev 0 up ... hcid[1963]: Device hci0 has been added ... hcid[1963]: Starting security manager 0 ... hcid[1963]: Device hci0 has been activated ...
The blue led indicator should start blinking as well. Now verify that your bluetooth device is up and running:
# hciconfig -a hci0: Type: USB BD Address: 00:0E:9B:87:3B:90 ACL MTU: 192:8 SCO MTU: 64:8 UP RUNNING PSCAN RX bytes:940 acl:0 sco:0 events:23 errors:0 TX bytes:586 acl:0 sco:0 commands:22 errors:0 Features: 0xff 0xff 0x0f 0x00 0x00 0x00 0x00 0x00 Packet type: DM1 DM3 DM5 DH1 DH3 DH5 HV1 HV2 HV3 Link policy: RSWITCH HOLD SNIFF PARK Link mode: SLAVE ACCEPT Name: 'redneck.superwise.net-0' Class: 0x100100 Service Classes: Object Transfer Device Class: Computer, Uncategorized HCI Ver: 1.1 (0x1) HCI Rev: 0x20d LMP Ver: 1.1 (0x1) LMP Subver: 0x20d Manufacturer: Cambridge Silicon Radio (10)
If you have come this far without any problems you are all set and ready to go.
To help get you started I have summarized the basic steps to hook up your bluetooth capable phone as a modem. I am using a Sony Ericsson P900 myself, but the steps are general so it should work for most bluetooth phones.
The steps below are exactly the same whether you intend to connect to a remote modem or connect over GPRS. When connecting over GPRS the phone also needs to be connected and recognized as a modem. It is the actual dialing later on in the process that differs.
With FC4 and FC5 I experienced some issues with the PIN-helper, i.e. the dialog window that prompts for a PIN code. However, no such issues has been observed with Fedora 8.
First you need to configure your phone so it is available to your laptop. These steps may vary in detail depending on vendor and model, so the user manual for your phone may be handy.
Start by activating bluetooth on your phone and scan for other devices. You should now be able to see your computer.
Add your computer as a known bluetooth device to your phone. The phone will
ask you for the pin code to connect to your computer. By default it is
BlueZ, but you may modify it in
/etc/bluetooth/hcid.conf. Use the same pin code when the computer
prompts you whether to allow the incoming connection.
For convenience you should now configure your phone to allow this device (your computer) to connect without prompting for a pin code.
Now we are ready to configure the laptop. Start by scanning for bluetooth devices in your surrounding:
# hcitool scan Scanning ... 00:0A:D9:E9:D8:4F S-Gs P900
The first field is the bluetooth address of your phone. The second field contains its given name. You should also be able to ping it by its address:
# l2ping 00:0A:D9:E9:D8:4F Ping: 00:0A:D9:E9:D8:4F from 00:0E:9B:87:3B:90 (data size 44) ... 0 bytes from 00:0A:D9:E9:D8:4F id 0 time 60.87ms 0 bytes from 00:0A:D9:E9:D8:4F id 1 time 27.77ms 0 bytes from 00:0A:D9:E9:D8:4F id 2 time 36.54ms 3 sent, 3 received, 0% loss
Note that you should use your own phones address instead. (My phone will probably be out of range :-)
Now it is time to find out what services your phone provides:
# sdptool browse 00:0A:D9:E9:D8:4F Browsing 00:0A:D9:E9:D8:4F ... Service Name: Voice gateway Service Description: Voice gateway Service Provider: Sony Ericsson Service RecHandle: 0x10000 Service Class ID List: "Headset Audio Gateway" (0x1112) "Generic Audio" (0x1203) Protocol Descriptor List: "L2CAP" (0x0100) "RFCOMM" (0x0003) Channel: 8 Language Base Attr List: code_ISO639: 0x656e encoding: 0x6a base_offset: 0x100 Profile Descriptor List: "Headset" (0x1108) Version: 0x0100 Service Name: OBEX Object Push Service RecHandle: 0x10001 Service Class ID List: "OBEX Object Push" (0x1105) Protocol Descriptor List: "L2CAP" (0x0100) "RFCOMM" (0x0003) Channel: 1 "OBEX" (0x0008) Profile Descriptor List: "OBEX Object Push" (0x1105) Version: 0x0100 Service Name: OBEX File Transfer Service RecHandle: 0x10002 Service Class ID List: "OBEX File Transfer" (0x1106) Protocol Descriptor List: "L2CAP" (0x0100) "RFCOMM" (0x0003) Channel: 2 "OBEX" (0x0008) Service Name: Bluetooth Serial Port Service Description: Bluetooth Serial Port Service Provider: Symbian Ltd. Service RecHandle: 0x10003 Service Class ID List: "Serial Port" (0x1101) Protocol Descriptor List: "L2CAP" (0x0100) "RFCOMM" (0x0003) Channel: 3 Language Base Attr List: code_ISO639: 0x656e encoding: 0x6a base_offset: 0x100 Service Name: Dial-up Networking Service Description: Dial-up Networking Service Provider: Sony Ericsson Service RecHandle: 0x10004 Service Class ID List: "Dialup Networking" (0x1103) Protocol Descriptor List: "L2CAP" (0x0100) "RFCOMM" (0x0003) Channel: 4 Language Base Attr List: code_ISO639: 0x656e encoding: 0x6a base_offset: 0x100 Profile Descriptor List: "Dialup Networking" (0x1103) Version: 0x0100
To use the phone as a modem the service of interest is the Dial-up Networking, so note its channel number.
The next step will be to create a virtual serial device and connect it to your phone:
# rfcomm connect 1 00:0A:D9:E9:D8:4F 4 Connected /dev/rfcomm1 to 00:0A:D9:E9:D8:4F on channel 4 Press CTRL-C for hangup
A short explanation of the command above:
rfcomm connect 1 00:0A:D9:E9:D8:4F 4 | | | /dev/rfcomm1 _| | |_ Channel for the Dial-up Your phones Networking service bluetooth address
That is about it. Now your phone is analogue to an external modem connected
to your virtual serial device, /dev/rfcomm1. Configure ppp to make
use of it and you are done.
Ok, now what? Do I need to repeat all the steps above each time I want to use my phone as a modem? No, for convenience you may configure your system for all this to take place automatically. However, the method you should use depends a bit on your phone.
The preferred method is to edit the rfcomm.conf file so a
/dev/rfcommX port automatically binds to the DUN service on
your phone when the bluetooth service starts. This means that the virtual serial
device will be created and properly configured, but not connected. The actual
connection will happen automagically when the virtual serial device is
accessed.
Edit the file /etc/bluetooth/rfcomm.conf to contain a section
similar to this:
rfcomm1 { # Automatically bind the device at startup bind yes; # Bluetooth address of the phone device 00:0A:D9:E9:D8:4F; # RFCOMM channel for the Dial Up Networking service channel 4; # Description of the connection comment "Modem on my phone"; }
If the method above works, you are all set and done. I started out that way and everything worked great for a while. Then all of a sudden I was unable to connect. It turned out that the DUN channel on my phone had changed!?! Instead of 4 as in the example above it showed up as channel 2, and later on as channel 3...
The statical configuration done by editing the rfcomm.conf file
cannot handle this confusion. Instead I needed to dynamically decide which
channel my phone used for the DUN service today and bind to it.
This is done in a simple shell script, that is called just before I intend to connect. Personally, I use Kppp and find it great for both modem-to-modem dial-ups and GPRS connections. So, I have configured KDE to call my script just before Kppp is opened.
First I was a bit suspicious about this method to work all the time, but I
have not had any trouble this far and I have been using it for years now. You
may find a printout of the script in Appendix C, or
download it from
http://ferrari.databa.se/3400/f8/dun-bind.sh.
Obviously, you will need to change the name of the bluetooth device,
BTNAME, and maybe the port to connect it to, RFPORT.
Once that is done you may test run it:
# wget http://ferrari.databa.se/3400/f8/dun-bind.sh # chmod +x dun-bind.sh # ./dun-bind.sh Checking for local Bluetooth device... [ OK ] Checking that /dev/rfcomm1 is free... [ OK ] Searching for remote Bluetooth device S-Gs P900... [ OK ] Searching for Dial Up Networking service... [ OK ] Binding /dev/rfcomm1 to DUN channel 3... [ OK ] # rfcomm -a rfcomm1: 00:0A:D9:E9:D8:4F channel 3 clean
Now all you need to do when you want to use your phone as a modem are the most basic steps:
As mentioned earlier the only difference between dialing modem-to-modem or using the phone as a GPRS gateway to internet is just a matter of configuration. Basic knowledge about modem commands and dialing is assumed, so modem-to-modem dialing is not described here. However, some short hints on GPRS connections are given below.
A GPRS connection is established by means of modem configuration rather than actual dialing. Two AT command strings are vital for GPRS connections. First a configuration string is used to specify things like protocol and network provider. This string is passed during modem initialization and in my case it is:
AT+CGDCONT=1,"IP","services.vodafone.net","",0,0
After initialization the actual dialing is substituted by sending a connection request to the network provider. The request contains the type of connection you want to use, e.g PPP. It should look similar to:
AT+CGDATA="PPP",1
When used in a connection tool like Kppp the sequence of AT commands may look similar to the one in the snapshot below.
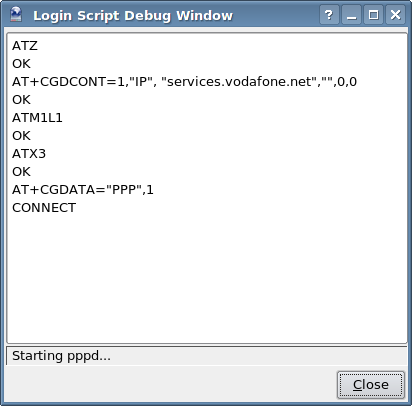
Notice the two AT strings discussed above. The other commands are mainly cosmetic and may differ depending on your tool and its configurations.
To send files to your OBEX (Object Exchange) capable phone you need the
packages openobex and openobex-apps.
# obex_push 3 00:0A:D9:E9:D8:4F test.jpg | | | |_ Bluetooth address to send to | |_Channel for the OBEX Object Push service
A more convenient way to do this is to use the KDE extension KBluetooth described in its own section below.
Once you have got bluetooth working it is a breeze to use a bluetooth mouse and/or keyboard, a.k.a Human Input Device. First you need to scan for your device. Make sure that bluetooth is activated on both the laptop and the mouse/keyboard. Then press the setup button on the mouse/keyboard to make it announce itself and type:
# hidd --search Searching ... Connecting to device 00:0A:94:C1:B6:5D
In the next section you will find a more user friendly and persistent way of connecting your bluetooth mouse/keayboard.
If you are running KDE, there is a Bluetooth extension called KBluetooth available. There is a similar package available for Gnome users, but KBluetooth is discussed here. Before starting to explore it you should make sure that all the details work. For this reason it is recommended that you start out with only the basic bluez-utils package as described in the sections above. Once your bluetooth works as expected, go ahead and install KBluetooth.
Once the details are in place and you know how things work, you may start to play around with KBluetooth. First verify that it is installed by:
# rpm -q kdebluetooth kdebluetooth-1.0-0.37.beta8.fc8
or install it with:
# yum install kdebluetooth
After installing kdebluetooth you need to restart KDE, by logging out and back on again. Once KDE is restarted KBluetooth will show up as a bluetooth icon in the panel. It offers several useful features.
Connecting a bluetooth mouse or keyboard with KBluetooth is really simple. Activate the mouse and move it around and it will be detected automatically. The first time it is detected an authentication dialog is raised.
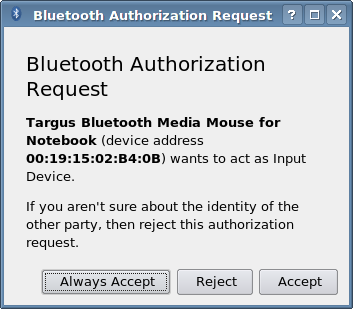
If you want to use the same device in the future without a new acknowledge press Always Accept, otherwise just press Accept. Could it be easier?
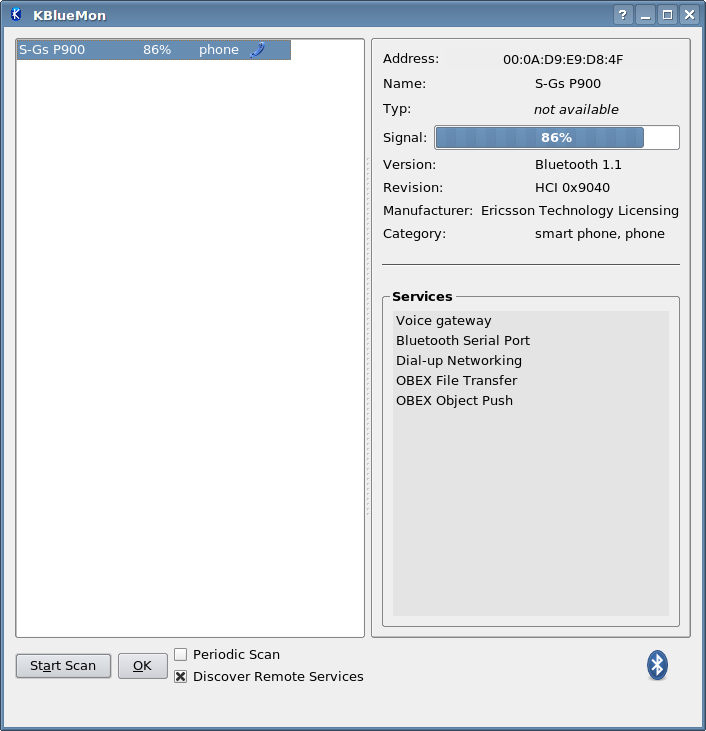
KBlueMon is a basic tool to scan for bluetooth devices nearby. It reports both device address and name, signal strength as well as what services the device provides.
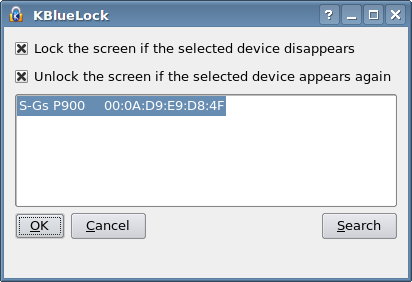
KBlueLock may be used to lock the screen whenever a bluetooth device becomes unreachable. Once the device appears again the screen is unlocked. This is a very convenient security measure to prevent others from fiddling with your Precious when you leave it unattended.
The Bluetooth OBEX Object Push client may be used to transfer files from the computer to your phone or other bluetooth device.

IrDA support is provided by means of the package irda-utils, so
first make sure that this package is installed on your system.
My first attempt started with changing the DEVICE in
/etc/sysconfig/irda to /dev/ttyS1 and fire up the IrDA
service (/etc/init.d/irda start). Voilà! Watching the log
messages verified that all modules were loaded and I had got a new device,
irda0, to play with. The device showed up with
ifconfig as well. It was just too easy! And yes, although all
looked perfect it did not work. Trying the irdadump reviled just a
big silence.
To make a long story short, the IR-chip in the Ferrari supports FIR (as well as SIR) and FIR is the default, while IrDA by default uses SIR. FIR is what you want to go for since it is faster than SIR and there is a stable Linux FIR driver available for this IR-chip. Below I'll walk you through the steps that got it working for me.
Start with grabbing a pen and a piece of paper and restart your
Precious. Yes, this is one of those few occasions when you need
to restart you Linux system. Press F2 during boot-up to
enter the BIOS and note the settings for your IR-port. You do not need
to change anything, but you need to know your exact setting. I will use
my own setting through out this example:
Base I/O address: [2F8] Interrupt: [IRQ 3] DMA channel: [DMA 1]
Once you have noticed your corresponding setting just exit the BIOS without saving and start your system.
Make sure that no other services use IRQ 3. Most likely your
setting is also IRQ 3, so start looking in the
/etc/pcmcia/config.opts file. Here you need to uncomment or
insert the line
exclude irq 3
to prevent the pcmcia service from intervening.
Now we want a module capable of handling FIR on the Ferrari chip to
be loaded when the IrDA service is started. The module of choice is
nsc-ircc, so add the following two lines in
/etc/modprobe.conf:
alias irda0 nsc-ircc options nsc-ircc dongle_id=0x09 io=0x2f8 irq=3 dma=1
Pay attention to use the settings from your own BIOS for the last three parameters.
We also need to tell the IrDa service to attach directly to the
device for our FIR capable module, so make sure to change the
DEVICE setting in /etc/sysconfig/irda to:
DEVICE=irda0
Then we do not want the generic Linux serial driver to interfere. One
way of doing that is to add the following line in
/etc/init.d/irda:
setserial /dev/ttyS1 uart none
The line should be place just before
daemon /usr/sbin/irattach ${DEVICE} ${ARGS}
While you are at it you might as well disable SIR by commenting out
the tty lines. A short snippet of the final
/etc/init.d/irda:
... # /sbin/modprobe ircomm-tty 2>/dev/null # /sbin/modprobe irtty-sir 2>/dev/null /sbin/modprobe irnet 2>/dev/null setserial /dev/ttyS1 uart none daemon /usr/sbin/irattach ${DEVICE} ${ARGS} ...
That is about it, You are done with the configuration.
Now start the IrDA service and watch the system log. Hopefully, you should see something similar the the following:
# service irda start Starting IrDA: [ OK ] # dmesg | tail ... ttyS1: LSR safety check engaged! pnp: Device 00:09 activated. nsc-ircc, chip->init nsc-ircc, Found chip at base=0x02e nsc-ircc, driver loaded (Dag Brattli) IrDA: Registered device irda0 nsc-ircc, Using dongle: IBM31T1100 or Temic TFDS6000/TFDS6500
This verifies that you have got the proper modules in place. The last step is to verify that we are able both of transmitting and receiving traffic. So activate IR on the remote device, e.g. your phone, and place the two IR-ports eye-to-eye. Then do a dump of the traffic:
# irdadump -i irda0 ...xid:cmd 62a9cc0d > ffffffff S=6 s=5 (14) ...xid:cmd 62a9cc0d > ffffffff S=6 s=* redneck hint=0400 [ Computer ] (23) ...xid:cmd ffffffff < 6f700c8d S=1 s=0 (14) ...xid:rsp 62a9cc0d > 6f700c8d S=1 s=0 redneck hint=0400 [ Computer ] (23) ...xid:cmd ffffffff < 6f700c8d S=1 s=* P900 hint=9325 [ PnP PDA/Palmtop Modem Telephony IrCOMM IrOBEX ] (21)
You're all set! The first I did after this was to use
irobex_palm3 <SIS-file> to upload and install GnuBox
and some other programs on my phone. To do this you need to have the
openobex and openobex-apps packages installed and your
phone must supports the OBEX protocol. Pretty neat!
The Ferrari 3400 has a Smart Link soft modem installed. After the Ferrari 3400 was produced Smart Link was acquired by Conexant. Conexant has a strange policy when it comes to providing drivers for it products. Linux drivers are not provided by Conexant, but by Linuxant. If you want all the features, fax, 56k, etc., they will charge you for it. Although, a crippled version is free. I do not like that philosophy at all. First you pay for the product, then they make you pay again if you want to use it...
Fedora x86_64 has the ALSA kernel module snd_via82xx_modem
pre-compiled. That module is capable of handling the internal soft-modem.
Furthermore, this module is properly loaded at startup. However, the modem is
still a Smart Link soft-modem so we need a corresponding user space daemon that
utilize this ALSA support for our modem.
Notice that the source code distributed by Linuxant is divided in two parts, one general modem daemon and hardware specific drivers in the form of kernel modules. Since we already have an ALSA driver for our model we only need the modem daemon compiled with ALSA support.
That part is provided by Linmodems (http://linmodems.technion.ac.il). They do a great job in providing binary modem daemons, by regular compiles of the Linuxant code. This daemon may very well be compiled as a 32-bit executable. Even if we are running on a 64-bit platform.
Note: Unfortunately the modem support is still unstable. Depending on the versions of the modem daemon and the kernel it might work. Even though, it is very fragile and might very well break on the next kernel update.
Since I do not use the modem I can live with this situation, but I am not happy about it. The installation is not too complicated and is outlined below.
Here are the basic steps to get the modem daemon up and running:
Start by checking that the alsa-utils package is
installed:
# rpm -q alsa-utils alsa-utils-1.0.15-1.fc8
otherwise install it like this:
# yum install alsa-utils
Verfiy that the proper ALSA kernel module is loaded and recognizes the modem:
# aplay -l ... card 1: modem [VIA 82XX modem], device 0: VIA 82XX modem [VIA 82XX modem] Subdevices: 1/1 Subdevice #0: subdevice #0
Download the compiled modem daemon,
SLMODEMD.gcc4.2.tar.gz, or later from
http://linmodems.technion.ac.il/packages/smartlink/.
Unpack and install the daemon:
# tar zxf SLMODEMD.gcc4.2.tar.gz # cd SLMODEMD.gcc4.2 # install -m 755 slmodemd /usr/sbin/slmodemd
Verify that the SmartLink driver is able to find and configure an interface for the modem:
# slmodemd --country=SWEDEN --alsa --nortpriority symbolic link `/dev/ttySL0' -> `/dev/pts/5' created. modem `modem:1' created. TTY is `/dev/pts/5' Use `/dev/ttySL0' as modem device, Ctrl+C for termination.
You may see a complete list of recognized countries by:
# slmodemd --countrylist
For convenience I want the modem driver configured as a service that
is started by the Sys V init system. However, the
scripts/slmodemd file shipped with the package needs to be
modified a bit in order to accomplish this. You will find my modified
version in Appendix D.
Download and add this script as a service to the Sys V system:
# wget http://ferrari.databa.se/3400/f8/slmodemd-sysv-init.sh # chmod u+x slmodemd-sysv-init.sh # ./slmodemd-sysv-init.sh install
Now edit your configuration options in
/etc/sysconfig/slmodemd:
# A list of all supported country names can be retrieved # by calling "slmodemd --countrylist" from the shell prompt. SLMODEMD_COUNTRY="SWEDEN" # No additional device needed for ALSA mode SLMODEMD_DEVICE= # If set to yes the Advanced Linux Sound Architecture # subsystem is used to make your modem working. USE_ALSA="yes" # Other options, see slmodemd --help for details SLMODEMD_OPTS="--nortpriority"
Verify that the new service starts correctly:
# service slmodemd start Starting SmartLink Modem driver: [ OK ] # service slmodemd status slmodemd (pid 8356) is running...
and look in /var/log/messages:
# tail /var/log/messages ...slmodemd: symbolic link `/dev/ttySL0' -> `/dev/pts/6' created. ...slmodemd: modem `modem:1' created. TTY is `/dev/pts/6' ...slmodemd: Use `/dev/ttySL0' as modem device, Ctrl+C for termination.
Just as the system log says you may now find the modem at
/dev/ttySL0. However, before starting to use the modem you should
continue to read about a potential issue.
As mentioned in the beginning of this section there might be a potential problem. It was noticed in my previous attempts to get the modem working and it still exists. It all depends on your setup. If you get it to play there should be no problems, until your next update... Otherwise, you will likely notice something similar to the descriptions below.
The problem might occur while establishing a connection. The best way to
observe this is to start slmodemd manually with the debug flag
set:
# service slmodemd stop Shutting down SmartLink Modem driver: [ OK ] # slmodemd -d=1 --alsa --country="SWEDEN" --nortpriority
Once the daemon is running in debug mode, dial the preferred number. The modem goes on-line, dials the number and the other end answers. Before the connection is established the daemon bails out during the negotiation with the other part.
It starts to flood the console with the following messages:
... <212.190899> main: alsa xrun: try to recover... <212.191065> main: alsa xrun: recovered. <212.191069> main: dev read = 0 <212.191185> main: alsa xrun: try to recover... <212.191351> main: alsa xrun: recovered. <212.191355> main: dev read = 0 ...
The slmodemd process is stopped with Ctrl-C or
service slmodemd stop from another console window.
If you are lucky the modem might be connecting properly and you may use it to take care of business. Dialing and connecting works fine and the debug output looks ok. However, when the session is disconnected the debug output goes south. It will start to flood the console with the exact same messages as seen above during a connect. In this case we may actually use the modem but need a small tweak.
My temporary fix for the problem in this case is to restart the
slmodemd service right after disconnecting a session. I configure
my dial-up client, Kppp, to execute /etc/init.d/slmodemd restart
upon disconnect. Unarguable this is a really dirty fix, but works quite
well.
The issue reported above together with the fact that slmodemd
runs with real-time priority by default may be devastating. When the modem
daemon goes insane it will hug your CPU and squeeze it all real hard.
If the daemon has real-time priority you will have a hard to get control over you system again and a forced shutdown might be the only way out.
Note: You should always run slmodemd with the
--nortpriority option set. Failing to do so might hang your entire
system.
This document is a revised version of
FC4-x86_64 on the Acer Ferrari 3400LMi http://ferrari.databa.se/3400/fc4/
Below are the links I found most useful when I originally sat up My Precious. Thank you guys:
XStrikeForce/HowToRandR12 - Debian Wiki Brice Goglin http://wiki.debian.org/XStrikeForce/HowToRandR12
Linux IEEE 1394 drivers http://www.linux1394.org
Fedora Core 1 on the Acer Ferrari 3000LMi by Evan http://ferrari.kicks-ass.org/
SuSE 9.1 Pro on the Acer Ferrari 3000LMi by Dirk Praet http://www.designisdead.com/ferrari/
Wireless LAN resources for Linux by Jean Tourrilhes http://www.hpl.hp.com/personal/Jean_Tourrilhes/Linux/Wireless.html
/etc/X11/xorg.conf# Xorg 7.2 configuration for Acer Ferrari 3400 LMi # # Available at http://ferrari.databa.se/3400/f8/xorg.conf Section "ServerLayout" Identifier "Default Layout" Screen 0 "Screen0" 0 0 InputDevice "Keyboard0" "CoreKeyboard" InputDevice "Synaptics" "CorePointer" EndSection Section "InputDevice" Identifier "Keyboard0" Driver "kbd" Option "XkbModel" "pc105" Option "XkbLayout" "se" EndSection Section "InputDevice" Identifier "Synaptics" Driver "synaptics" Option "Device" "/dev/input/mice" Option "Protocol" "auto-dev" Option "Emulate3Buttons" "yes" EndSection Section "Monitor" Identifier "Internal Panel" VendorName "Acer" ModelName "Ferrari 3400 LMi" # Option "PreferredMode" "1400x1050" EndSection Section "Monitor" Identifier "External VGA Monitor" # Option "LeftOf" "Internal Panel" EndSection Section "Monitor" Identifier "External TV" # Option "RightOf" "Internal Panel" EndSection Section "Device" Identifier "Videocard0" Driver "radeon" Option "Monitor-LVDS" "Internal Panel" Option "Monitor-VGA-0" "External VGA Monitor" Option "Monitor-S-video" "External TV" # Option "AccelMethod" "XAA" # Option "AGPMode" "1" # Option "ColorTiling" "1" Option "EnablePageFlip" "1" EndSection Section "Screen" Identifier "Screen0" Device "Videocard0" DefaultDepth 24 SubSection "Display" Viewport 0 0 Depth 24 Virtual 3000 2000 EndSubSection EndSection
dual-head.sh#!/bin/bash # # Available at http://ferrari.databa.se/3400/f8/dual-head.sh # # A script to manipulate connected graphical outputs, # including TV-out. It includes the most common operations # and may also be configured to run on an XF86Display event. # Typically Fn-F5 or similar on a laptop. # # Prerequisites: # This script will work with one graphics card only. # Furthermore it will only work with two CRTCs, # i.e. two outputs may be simultaneous active. # # Comments: # In order to optimize performance and minimize flicker # xrandr is at most called twice. Once to read the current # state and once for setting the new state. Thus, some code # may look strange at the first glance. # # By Sven-Göran Bergh, 2008-01-01 # ### Edit user settings here: ###################################### # DEFAULTACTION="toggle" # May be changed with argument 1 DEFAULTSIDE="left" # May be changed with argument 2 # ################################################################### ### Edit hardware specific settings here: ######################### # INTERNAL="LVDS" # Specify the name of the internal display TVOUTPUT="S-video" # Specify the name of the TV-output TVMODE="pal" # Specify TV mode, PAL or NTSC # ################################################################### # Get X user #XUSER=$(w | awk '$3 ~ /^:[0-9]$/ {print $1; nextfile}') # Get X display (current or first running) DISPLAY=${DISPLAY:= \ $( w | awk '$3 ~ /^:[0-9]$/ {print $3; nextfile}' )} # Quit if no X-server is running [ "${DISPLAY}" ] || exit 1 function usage() { printf "Usage: %s [init|toggle|status|internal|tv [side]]\n" \ "`basename $0`" } ME=`basename $0 .sh` # What to do? ACTION="${1:-$DEFAULTACTION}" # Which side of $INTERNAL should the external output be shown? SIDE="${2:-$DEFAULTSIDE}" # If invalid action or help, quit before calling xrandr case `echo "$ACTION" | tr A-Z a-z` in init | toggle | status | internal | tv ) # Recognized actions. Do nothing and continue... ;; help | usage ) usage exit 0 ;; * ) printf "%s: Unknown operation, %s\n" "$ME" "$ACTION" usage exit 1 ;; esac # Get information about all outputs ALLINFO=( $( \ xrandr -q \ | awk -- '/connected/ { printf " %s", $1; if ($2 !~ /dis/) { if ($3 ~ /[0-9]+x/) printf "@%s", $3; else printf "@"; } }' \ ) ) # Initialize some useful variables for (( i=0; i<${#ALLINFO[*]}; i++ )) { # Array with all outputs ALLOUT[$i]=$( \ echo "${ALLINFO[$i]}" \ | awk -F@ -- '{print $1}' \ ) # Array with all connected outputs CONCTD[$i]=$( \ echo "${ALLINFO[$i]}" \ | awk -F@ -- '/@/ {print $1}' \ ) # Array with all active outputs ACTIVE[$i]=$( \ echo "${ALLINFO[$i]}" \ | awk -F@ -- '/@[0-9]+x/ {print $1}' \ ) # Array with all resolutions ALLRES[$i]=$( \ echo "${ALLINFO[$i]}" \ | awk -F@ -- '{print $2}' \ | awk -F+ -- '{print $1}' \ ) # Array with all positions ALLPOS[$i]=$( \ echo "${ALLINFO[$i]}" \ | awk -F@ -- '{print $2}' \ | awk -F+ -- '/+/ {print $2 "+" $3}' \ ) # Index for the internal output [ "${ALLOUT[$i]}" == "$INTERNAL" ] && INTNDX=$i # Index for the currently active external output [ "${ACTIVE[$i]}" -a "${ACTIVE[$i]}" != "$INTERNAL" ] \ && CURNDX=$i } CURNDX=${CURNDX:-$INTNDX} CURRENT=${ALLOUT[$CURNDX]} case `echo "${SIDE}" | tr A-Z a-z` in left) LOCATION="--left-of $INTERNAL" ;; right) LOCATION="--right-of $INTERNAL" ;; top|above) LOCATION="--above $INTERNAL" ;; bottom|below) LOCATION="--below $INTERNAL" ;; esac function run() { EXEC="$*" logger -t $ME "Executing: $EXEC" $EXEC | logger -t $ME } function init() { # Set load detection on all external outputs for out in ${ALLOUT[*]}; do [ "$out" != "$INTERNAL" ] && \ INIT="$INIT --output $out --set load_detection 1" [ "$out" == "$TVOUTPUT" ] && \ INIT="$INIT --set tv_standard $TVMODE" done run xrandr $INIT } function status() { printf "%-10s%-11s%-8s%-10s%-10s\n" \ "Output" "Connected" "Active" "Position" "Resolution" for (( i=0; i<${#ALLOUT[*]}; i++ )) { [ "${CONCTD[$i]}" ] && c="yes" || c="no" [ "${ACTIVE[$i]}" ] && a="yes" || a="no" printf "%-13s%-9s%-7s%-10s%-10s\n" \ "${ALLOUT[$i]}" "$c" "$a" \ "${ALLPOS[$i]}" "${ALLRES[$i]}" } } function internal() { # Internal output always active INT="--output $INTERNAL --auto --pos 0x0" # Turn off currently active external output [ "$CURRENT" != "$INTERNAL" ] && \ OFF="--output $CURRENT --off" run xrandr $INT $OFF } function tvout() { # If TV-output already active, exit [ "$CURRENT" == "$TVOUTPUT" ] && exit 0 # Internal output always active INT="--output $INTERNAL --auto" # Turn off currently active external output [ "$CURRENT" != "$INTERNAL" ] && \ OFF="--output $CURRENT --off" TV="--output $TVOUTPUT --auto $LOCATION" run xrandr $INT $TV $OFF } function toggle() { # Go to the next connection mode in the toggle sequence: # LVDS (single) => # LVDS+S-video (mirror) => # LVDS+S-video (side-by-side) => # LVDS+VGA-0 (mirror) => # LVDS+VGA-0 (side-by-side) => # LVDS (single) => # ... # Connection modes that include not connected outputs are skipped. # Ex: with only VGA-0 connected it is only three connection modes: # if [ "$CURRENT" != "$INTERNAL" -a \ "${ALLPOS[$INTNDX]}" == "${ALLPOS[$CURNDX]}" ]; then NEXT=$CURRENT else for (( i=0; i<${#ALLOUT[*]}; i++ )) { [ "${CONCTD[$i]}" == "${CURRENT}" ] && break } until [ "$NEXT" ]; do i=$(( ($i+1)%${#ALLOUT[*]} )) NEXT=${CONCTD[$i]} done fi # Internal output always active INT="--output $INTERNAL --auto" # Turn off currently active external output [ "$CURRENT" != "$INTERNAL" -a "$CURRENT" != "$NEXT" ] && \ OFF="--output $CURRENT --off" # Turn on next connected external output [ "$NEXT" != "$INTERNAL" ] && \ ON="--output $NEXT --auto" # If mirror mode, reposition internal output. # Otherwise position external output [ "$NEXT" != "$CURRENT" ] \ && INT="$INT --pos 0x0" \ || ON="$ON $LOCATION" run xrandr $INT $OFF $ON } case `echo "$ACTION" | tr A-Z a-z` in init) init ;; toggle) toggle ;; status) status ;; internal) internal ;; tv) tvout ;; *) usage ;; esac
dun-bind.sh#!/bin/sh # # Available at http://ferrari.databa.se/3400/f8/dun-bind.sh # # A verbose sample script for finding the Dial Up Networking # channel on a Bluetooth device and binding a /dev/rfcomm port to it. # # By Sven-Göran Bergh, 2005-11-03 # Update 2007-04-03 Added release of passive/closed rfcomm port. # # Use this /dev/rfcomm port RFPORT=1 # Name of Bluetooth device to bind to: BTNAME="S-Gs P900" success() { echo -e $"\\033[60G[ \\033[1;32mOK\\033[0;39m ]" return 0 } failure() { echo -e $"\\033[60G[\\033[1;31mFAILED\\033[0;39m]" exit 1 } # Check that local Bluetooth device is active echo -n $"Checking for local Bluetooth device..." hciconfig | grep 'UP RUNNING' &> /dev/null \ && success || failure # If the rfcomm port exists but is currently not in use, try to release it if [ "`rfcomm show ${RFPORT} 2> /dev/null | awk -- '{print $5}'`" == "closed" ]; then echo -n $"Trying to free closed port /dev/rfcomm${RFPORT}..." rfcomm release ${RFPORT} &> /dev/null \ && success || failure fi # Check if the rfcomm port is free echo -n $"Checking that /dev/rfcomm${RFPORT} is free..." rfcomm show ${RFPORT} &> /dev/null \ && failure || success # Check for the remote Bluetooth device echo -n $"Searching for remote Bluetooth device ${BTNAME}..." BTADDR=`hcitool scan | grep "${BTNAME}" | awk -- '{print $1}'` [ "${BTADDR}" ] && success || failure # Find the Dial Up Networking channel echo -n $"Searching for Dial Up Networking service..." DUN=`sdptool search --bdaddr ${BTADDR} DUN \ | awk -- '/Channel/ {print $2}'` [ "${DUN}" ] && success || failure # Bind the rfcomm port to the DUN channel echo -n $"Binding /dev/rfcomm${RFPORT} to DUN channel ${DUN}..." rfcomm bind ${RFPORT} ${BTADDR} ${DUN} \ && success || failure
/etc/init.d/slmodemd#!/bin/sh # # Available at http://ferrari.databa.se/3400/f8/slmodemd-sysv-init.sh # Use slmodemd-sysv-init.sh install to install it. # # slmodemd: Starts the SmartLink Modem Daemon # # chkconfig: 345 90 10 # description: This is the user space part of the SmartLink Modem driver # processname: slmodemd # config: /etc/sysconfig/slmodemd # Source function library. . /etc/init.d/functions PROG=slmodemd RETVAL=0 # Default configuration SLMODEMD_DEVICE= SLMODEMD_OPTS= SLMODEMD_COUNTRY=SWEDEN USE_ALSA="yes" # Source configuration CONFIG=/etc/sysconfig/${PROG} if [ -f $CONFIG ]; then . $CONFIG # override default group and permissions if defined in $CONFIG; # other valid options also can be put into SLMODEMD_OPTS variable [ "$GROUP" ] \ && SLMODEMD_OPTS="$SLMODEMD_OPTS --group=$GROUP" [ "$PERMS" ] \ && SLMODEMD_OPTS="$SLMODEMD_OPTS --perm=$PERMS" fi # Do not try to start on a kernel which does not support it if [ $USE_ALSA != "yes" ]; then grep -q 'slamr\.o' /lib/modules/`uname -r`/modules.dep || exit 0 fi if [ $USE_ALSA = "yes" ]; then SLMODEMD_OPTS="$SLMODEMD_OPTS --alsa" else SLMODEMD_OPTS="$SLMODEMD_OPTS $SLMODEMD_DEVICE" fi start() { echo -n "Starting SmartLink Modem driver: " ${PROG} --country=$SLMODEMD_COUNTRY $SLMODEMD_OPTS 2>&1 \ | logger -t ${PROG} & PID=`pidof ${PROG}` RETVAL=$? [ $RETVAL -eq 0 ] \ && success $"${PROG} startup" \ || failure $"${PROG} startup" echo [ $RETVAL -eq 0 ] \ && touch /var/lock/subsys/${PROG} return $RETVAL } stop() { echo -n "Shutting down SmartLink Modem driver: " killproc ${PROG} RETVAL=$? [ $RETVAL -eq 0 ] && rm -f /var/lock/subsys/${PROG} echo return $RETVAL } # See how we were called. case "$1" in start) start ;; stop) stop ;; status) status ${PROG} RETVAL=$? ;; restart|reload) stop start RETVAL=$? ;; condrestart) if [ -f /var/lock/subsys/${PROG} ]; then stop start RETVAL=$? fi ;; install) install -t -m 755 $0 /etc/init.d/${PROG} &> /dev/null chkconfig --add ${PROG} ;; *) echo "Usage: ${PROG} {start|stop|status|restart|condrestart|install}" exit 1 esac exit $RETVAL
2005-2008 © Sven-Göran Bergh, Systemasis AB